Difference between revisions of "Conditions and Values"
| (3 intermediate revisions by the same user not shown) | |||
| Line 7: | Line 7: | ||
[[File:Conditions.png|thumb|Adding conditions]] | [[File:Conditions.png|thumb|Adding conditions]] | ||
| − | <strong>Conditions</strong> are boolean based variables and contain | + | <strong>Conditions</strong> are boolean based variables and contain a value of either "true" or "false". You can create 2 types of conditions:<br/> |
* <span class="inlinecode>Variable:</span> This is a single condition which contains a boolean value of "true" or "false". When adding it, you define an initial value and can change that value at any time during the game through the [[Action Parts#Change condition|"Change condition"]] action part. | * <span class="inlinecode>Variable:</span> This is a single condition which contains a boolean value of "true" or "false". When adding it, you define an initial value and can change that value at any time during the game through the [[Action Parts#Change condition|"Change condition"]] action part. | ||
| − | * <span class="inlinecode>Combined:</span> This allows you to combine several conditions through logical operators ("and", "or", "negate"). It is not possible to | + | * <span class="inlinecode>Combined:</span> This allows you to combine several conditions, values, and Lua queries through logical operators ("and", "or", "negate"). It is not possible to set the value of combined conditions directly; their value results from the variables/statements it is made up of. |
| Line 53: | Line 53: | ||
== Build "if…else" queries == | == Build "if…else" queries == | ||
| − | [[File:Game logic example.png|thumb|Try to open a locked chest]] | + | [[File:Game logic example.png|thumb|250px|Try to open a locked chest]] |
The obvious use of conditions and values is for building your game logic through "if…else" queries: if a condition is true, do one thing; if it is false, do another thing. Or: if a value is greater than 5, do one thing; if it is less than 5 but greater than 0, do a second thing; if it is less than 0, do a third thing. | The obvious use of conditions and values is for building your game logic through "if…else" queries: if a condition is true, do one thing; if it is false, do another thing. Or: if a value is greater than 5, do one thing; if it is less than 5 but greater than 0, do a second thing; if it is less than 0, do a third thing. | ||
| Line 61: | Line 61: | ||
== Disable/Enable objects == | == Disable/Enable objects == | ||
| − | [[File:Object condition.png|thumb|Control object visibility through condition]] | + | [[File:Object condition.png|thumb|250px|Control object visibility through condition]] |
| − | The second use case for conditions and values is linking them directly to objects | + | The second use case for conditions and values is linking them directly to objects and interface buttons via the "Properties" tab for the aforementioned objects, to quickly determine if the object is active (shown) or disabled (hidden). If disabled then all images and animations for the object will be hidden and all actions associated with the object will also be disabled; the cursor will not recognize the object anymore. This is very useful for quickly changing the environment of the scene or any other scenes for that matter, regardless of whether they are a playable scene, cut-scene or menu. |
| + | |||
| + | Besides objects and interface buttons, you can also disable/enable dialog parts by linking a condition or a value to them. | ||
| + | |||
| + | |||
| + | == Link conditions and values quickly == | ||
| + | |||
| + | [[File:Link condition.png|thumb|200px|"Drag" a link to the condition]] | ||
| + | If you want to link a condition or value, you usually click the link button and then navigate to the desired variable in the dialog window. There is a useful feature in the Visionaire editor to enhance that workflow. You can "drag" a connection out of the link button (see image) and drop it onto the condition or value. This is not limited to conditions and values but also works for other elements, like objects. The link button and the element you want to link have to be visible in the editor at the same time though, so you won't reach everything using that method. | ||
| + | |||
<div style="clear:both"></div> | <div style="clear:both"></div> | ||
{{toc}} | {{toc}} | ||
Latest revision as of 10:31, 16 January 2024
Conditions and Values are a fundamental necessity when it comes to game development as they allow us to dictate the events that can take place, have taken place or have yet to take place. They can also be used in "if…else" queries to determine if an event, or multiple events should be allowed to occur based on a condition's value or the integer number of a value.
Both conditions and values can be defined in various locations throughout the editor; there are "Conditions" and "Values" tabs everywhere. From the engine's perspective it doesn't matter where you add them, because they are accessible from anywhere. To keep track of your game logic it makes sense though to add them in places where they logically belong. – If you need a condition called "key_taken" to control the visibility of a key object, you should add this condition to the key object or to the corresponding scene rather than to, let's say a character that appears somewhere else in your game. But wherever you put it, you may always link it for setting the state/visibility of your key.
Conditions
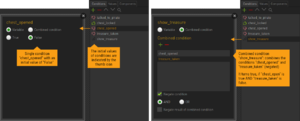
Conditions are boolean based variables and contain a value of either "true" or "false". You can create 2 types of conditions:
- Variable: This is a single condition which contains a boolean value of "true" or "false". When adding it, you define an initial value and can change that value at any time during the game through the "Change condition" action part.
- Combined: This allows you to combine several conditions, values, and Lua queries through logical operators ("and", "or", "negate"). It is not possible to set the value of combined conditions directly; their value results from the variables/statements it is made up of.
Values
Integer variables
Values are first and foremost integer based variables. When adding them, you define an initial value which may be a fixed or a random number from a range you set. During the game you have multiple options inside of the "Set value" action part such as directly setting a new integer value (=), adding to current value (+), subtracting from current value (-), multiplying current value (*), and dividing the current value (/). You can also link another value variable to take its number value. The "Set random value" action part allows you to set a random value.
String variables
It is also possible to use a value as a string variable instead of as an integer variable. You may set the initial string when adding the value, but you can't change the string via the "Set value" or any other action part, nor can you use the string value in an action part "if…else" query or link it to an object. You need Lua scripting to make use of string type values:
-- example of handling string type values with lua
local val = Values["add_value_name_here"] -- store value into a variable
local str = val.String -- store linked value's "string" value into a variable

val.String = "add new string value here" -- create a new string value


-- quick if query example
if str == "hello world" then
 return true
else
 return false
end
Display values
You may print out values as part of a text, both integer and string type values. Use the following markup:
- Integers: <v=value_name>
- Strings: <vs=value_name>
See the text page for some examples.
Build "if…else" queries
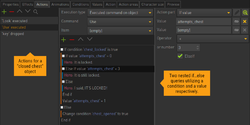
The obvious use of conditions and values is for building your game logic through "if…else" queries: if a condition is true, do one thing; if it is false, do another thing. Or: if a value is greater than 5, do one thing; if it is less than 5 but greater than 0, do a second thing; if it is less than 0, do a third thing.
Use the "If condition" and "If value" action parts to create these structures. There are more "If" action parts available querying other aspects of the game, such as "If character has item", "If character is on scene", or "If language is current language".
Disable/Enable objects
The second use case for conditions and values is linking them directly to objects and interface buttons via the "Properties" tab for the aforementioned objects, to quickly determine if the object is active (shown) or disabled (hidden). If disabled then all images and animations for the object will be hidden and all actions associated with the object will also be disabled; the cursor will not recognize the object anymore. This is very useful for quickly changing the environment of the scene or any other scenes for that matter, regardless of whether they are a playable scene, cut-scene or menu.
Besides objects and interface buttons, you can also disable/enable dialog parts by linking a condition or a value to them.
Link conditions and values quickly
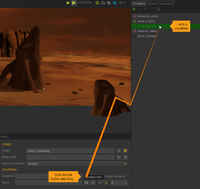
If you want to link a condition or value, you usually click the link button and then navigate to the desired variable in the dialog window. There is a useful feature in the Visionaire editor to enhance that workflow. You can "drag" a connection out of the link button (see image) and drop it onto the condition or value. This is not limited to conditions and values but also works for other elements, like objects. The link button and the element you want to link have to be visible in the editor at the same time though, so you won't reach everything using that method.


