Difference between revisions of "How To Disable Interaction Without Hiding the Cursor (h2)"
(Created page with "{| class="ts" style="width:100%" |- ! style="text-align:left" | Name !! style="text-align:left;width:10%" | By |- | Disable Interaction Without Hiding the Mouse Cursor (interf...") |
|||
| Line 11: | Line 11: | ||
== Tutorial == | == Tutorial == | ||
One of the first things I did was create a transparent image file the size of the default game resolution (1920x1080 in my case) & then I created a semi-transparent version of my default mouse cursor - you can create a custom cursor to indicate loading/inactive state if you prefer. | One of the first things I did was create a transparent image file the size of the default game resolution (1920x1080 in my case) & then I created a semi-transparent version of my default mouse cursor - you can create a custom cursor to indicate loading/inactive state if you prefer. | ||
| + | |||
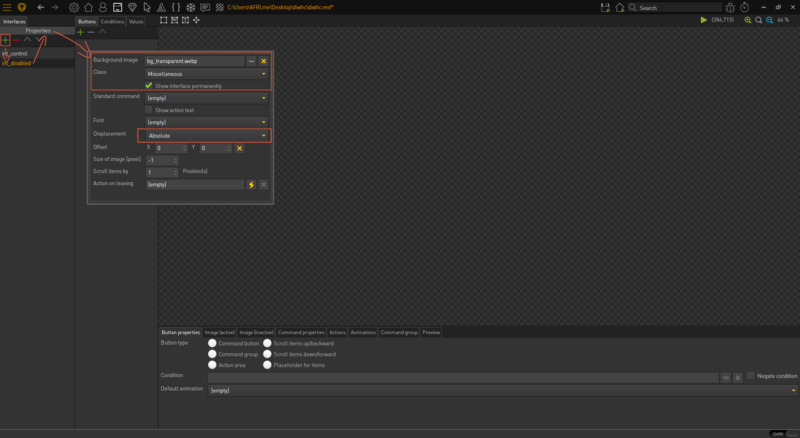
| + | After you've done sorting out those images, open up the interface section of the editor & create a new interface. Now open up the properties for the interface & assign the image with the transparent background you created to the background image section. Tick the '''show interface permanently''' option & set displacement to '''absolute'''. Don't forget to set the class to something like '''miscellaneous'''. & that's it for that, you can now feel free to close the properties tab. | ||
{| class="ts" | {| class="ts" | ||
|- | |- | ||
| − | | ''Quick note: You may also want to create a temporary image the same size of your game default resolution with a solid color as it makes it easier to draw the interface area when you can see exactly what you are working with.'' | + | | ''Quick note #1: You may also want to create a temporary image the same size of your game default resolution with a solid color as it makes it easier to draw the interface area when you can see exactly what you are working with.'' |
| + | |- | ||
| + | | ''Quick note: #2: You can create custom classes for interfaces with the explorer tool (ctrl/⌘ + e). I think we need to create documentation for the explorer tool, sorry for the inconvenience.'' | ||
|} | |} | ||
| − | |||
| − | |||
| − | |||
[[File:diwhc_1.png|800px]] | [[File:diwhc_1.png|800px]] | ||
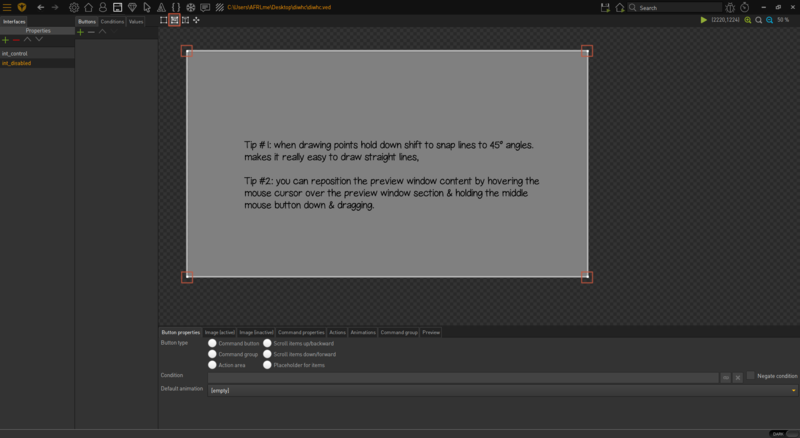
| − | + | Next you will be wanting to select the create and edit interface area button & then draw around the outer edges of your interface background. It should be approx. the same size as your default game resolution or greater. ''I recommend you use a temporary background image with a solid color to make it easier to draw around - if you do, then don't forget to set it back to the transparent background after you have finished setting the interface area.'' | |
[[File:diwhc_2.png|800px]] | [[File:diwhc_2.png|800px]] | ||
| − | + | Now navigate over to the characters section of the editor, then navigate to the interfaces tab of your playable character & assign the new interface you have created to them otherwise it will not show up when the game is running. | |
| − | |||
| − | |||
| − | |||
| − | + | [[File:diwhc_2.png|800px]] | |
| − | |||
| − | |||
| − | |||
| − | |||
| − | |||
| − | |||
| − | |||
| − | |||
| − | [[File: | ||
| − | |||
| − | |||
| − | |||
| − | |||
| − | |||
| − | |||
| − | |||
| − | |||
| − | |||
| − | |||
| − | |||
| − | |||
| − | |||
| − | |||
| − | |||
| − | |||
| − | |||
| − | |||
| − | |||
== Resources == | == Resources == | ||
Revision as of 15:02, 18 April 2017
| Name | By |
|---|---|
| Disable Interaction Without Hiding the Mouse Cursor (interfaces, action parts, Lua) | AFRLme |
This tutorial shows you how to manually disable player interaction for events without using begin/end cutscene or show/hide cursor action parts. It also shows you how you could prevent the automatically triggered cutscene event whenever a display text / narration text action part is executed.
Tutorial
One of the first things I did was create a transparent image file the size of the default game resolution (1920x1080 in my case) & then I created a semi-transparent version of my default mouse cursor - you can create a custom cursor to indicate loading/inactive state if you prefer.
After you've done sorting out those images, open up the interface section of the editor & create a new interface. Now open up the properties for the interface & assign the image with the transparent background you created to the background image section. Tick the show interface permanently option & set displacement to absolute. Don't forget to set the class to something like miscellaneous. & that's it for that, you can now feel free to close the properties tab.
| Quick note #1: You may also want to create a temporary image the same size of your game default resolution with a solid color as it makes it easier to draw the interface area when you can see exactly what you are working with. |
| Quick note: #2: You can create custom classes for interfaces with the explorer tool (ctrl/⌘ + e). I think we need to create documentation for the explorer tool, sorry for the inconvenience. |
Next you will be wanting to select the create and edit interface area button & then draw around the outer edges of your interface background. It should be approx. the same size as your default game resolution or greater. I recommend you use a temporary background image with a solid color to make it easier to draw around - if you do, then don't forget to set it back to the transparent background after you have finished setting the interface area.
Now navigate over to the characters section of the editor, then navigate to the interfaces tab of your playable character & assign the new interface you have created to them otherwise it will not show up when the game is running.
Resources
| Name | Description |
|---|---|
| - | N/A |

