Menus
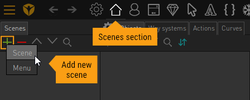
There are two types of scenes in Visionaire Studio: Scenes and Menus (don't get confused with the double meaning of the term "scene" here). When adding a new scene via the [+] icon, you can choose between the two types (see image). Scene type scenes are the stages of your game. Your characters walk through them, and the user can interact with objects you placed on them. It's basically what your world is made up of. Menu type scenes are almost the same, but without the characters, so to speak. They also have some special features used for menu screens.
Have a look at the Scenes and Objects page for information on scene properties, viewport handling, objects, and special scene actions. Those mostly apply to menus as well. You could technically add a way system to a menu, too, but since characters do not appear on menus, it wouldn't have any effect.
- Characters do not appear on menus.
- You can't set an Object center for objects on menus, because there is no need to define the "depth" of an object in relation to characters. The order in which objects are drawn on the menu solely depends on their order in the objects list.
- Game commands (as defined in your interface) are not available as action execution types in menus. You can only choose between the various mouse actions, which are all immediately executed, because no character is walking around.
- Since your commands are not available, you have to set a cursor for the menu in the scene properties.
- Action text will not get displayed on menus when hovering over object areas (interaction hotspots).
- You can automatically hide interfaces when showing a menu (enable/disable this behaviour in the Game Properties).
Menus are basically used for title and menu screens. You may also use them for puzzles or minigames, but there is usually no real advantage over using regular scenes.
Savegame areas
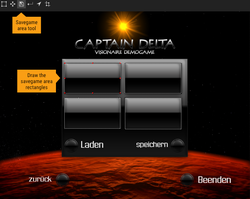
A special feature of menus is the possibility to add "savegame areas", rectangular areas on the menu to hold your savegames. Each of these save slots will show an in-game screenshot – taken at the time of saving – when used/occupied. Savegame areas are not linked to a scene object, but are their own special elements.
To add a savegame area, activate the savegame area tool (floppy disk icon) above the viewport and drag a rectangle onto your menu. The size of all savegame screenshots is based on the first save slot, so keep all the areas at the same size. You will notice that after you have drawn the first slot, you can add the following ones with identical dimensions by simply clicking into the menu (no need to drag the rectangle). Keep in mind that savegame areas are numbered internally in the order of drawing, so draw the first slot first, then the second one and so on – without rearranging their order later. You can however move the areas in place via mouse or arrow keys after drawing them, of course.
If during the game the player clicks on a save slot, the engine will register that and store the internal slot number to be able to then execute a save, load, or delete action on it. Create buttons with the Savegame action parts next to your savegame areas to let the player perform the desired action on the save slot he chose.
If you add scroll buttons using the Show next/previous savegames action part, you make the amount of available save slots infinite. In the scene properties you can define by how many positions to scroll on each click through the "Scroll savegames by" setting. You can also set a Font used for savegames – as the engine will automatically add a timestamp (and scene name if provided) underneath each savegame screenshot. Leave the font selection empty to not show any timestamp.
Some more things you should know about how the savegame system works:
- If the user chooses to save the game in an empty save slot and there are other free slots prior to the chosen one, the engine will automatically move the savegame to the first free slot to leave no gaps.
- If the chosen slot is already occupied, the existing savegame will be overwritten.
- The player won't get a visible reaction when hovering over or clicking on a savegame area, neither from the cursor nor from the slot itself. It is good practice to add objects at the same positions as the save slots, which you can use to give feedback to the player.
- Visionaire is not able to take screenshots on mobile devices, but you can add a pre-made savegame image to each scene that will get used instead.
Setting up a proper save/load menu can be somewhat challenging. There is a tutorial available that addresses all aspects in detail.

