Difference between revisions of "Game Properties"
m (EK moved page Game Tab to Game Properties) |
|||
| Line 58: | Line 58: | ||
== Mouse properties == | == Mouse properties == | ||
| − | + | [[File:Mouse properties.png|thumb]] | |
| + | This section is where you setup global mouse actions. That's things like having the right mouse button always applying the "Look" command or holding the left mouse button display your "coin" style interface. When it comes to interaction with specific objects in your game, you define those mouse actions for the respective objects directly, not in these global settings. | ||
| + | |||
| + | You can setup actions for the following mouse events: | ||
| + | * <span style="color:NavajoWhite">Left mouse button</span> | ||
| + | * <span style="color:NavajoWhite">Right mouse button</span> | ||
| + | * <span style="color:NavajoWhite">Double click</span> of the left mouse button | ||
| + | * <span style="color:NavajoWhite">Middle mouse button</span> click (not scrolling the wheel) | ||
| + | * <span style="color:NavajoWhite">Mouse wheel up</span> | ||
| + | * <span style="color:NavajoWhite">Mouse wheel down</span> | ||
| + | * <span style="color:NavajoWhite">Left mouse button hold (button pressed)</span> | ||
| + | * <span style="color:NavajoWhite">Left mouse button hold (button released)</span> | ||
| + | |||
| + | |||
| + | As to the last two events, you can specify the amount of time by which holding of the left mouse button is treated as its own event, in milliseconds (<span style="color:NavajoWhite">"Time until mouse button hold"</span>). This setting is global, so it applies to individual "hold mouse button" actions for objects throughout your project, too. | ||
| + | |||
| + | Besides the global mouse actions, you may also set the playable character's general reaction to mouse events. In classical third-person point-and-click adventure games, the character always walks to where the user clicks with the left mouse button. If your game has a different approach, you may want to change that behaviour. Define the character's motion for left, right, and middle mouse button click as well as for the "hold mouse button (released)" event by choosing the appropriate "send character" option. | ||
| + | |||
| + | It is possible to change that general behaviour during the game through Lua script. That may come in handy in situations where your character is supposed to temporarily not move for some reason. Have a look at the following example: | ||
| + | <syntaxhighlight lang="lua"> | ||
| + | -- change the mouse click behaviour: the character will not move on mouse click | ||
| + | game.LeftClickBehaviour = eMouseActionBehaviourDoNotSendCharacter | ||
| + | game.RightClickBehaviour = eMouseActionBehaviourDoNotSendCharacter | ||
| + | </syntaxhighlight> | ||
== Key actions == | == Key actions == | ||
| − | + | [[File:Key actions.png|thumb]] | |
| + | As for the mouse events, you can define global key actions, too. Add a new action and select the appropriate key you wish to address as the action's execution type. The key selection list contains keyboard keys as well as gamepad keys, both in two variants: "pressed" and "released". You could use this to highlight object hotspots on key press and hide them again on key release, for example. | ||
== Game info == | == Game info == | ||
| − | + | [[File:Game info.png|thumb]] | |
| + | The game info section offers some text fields to enter game version and description. This information is for internal use only; it does not appear anywhere in the final build. There are also some project statistics on the right hand side. | ||
| + | |||
| + | On the left you can enter the various <span style="color:NavajoWhite">Languages</span> of your game; there must be at least one. It is recommended to use English terms, because the engine will show appropriate flags on text inputs, if it recognizes the language names. As soon as you have added the languages here, you are able to enter translations of your game texts (see the [[Text]] page for more on text). | ||
{{toc}} | {{toc}} | ||
Revision as of 13:05, 9 October 2022
Game properties
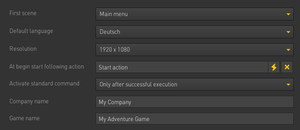
This section is where you setup the main game properties and global settings.
- First scene: Select the scene which will be shown after the loading screen and/or intro movie, if provided.
- Default language: Select the initial language which will be active on game start.
- Resolution: Set the game's resolution. If the desired resolution is not in the list, you can set a custom resolution via the explorer tool (Ctrl+E).
- At begin start following action: You can use this to perform actions on game launch (hide interfaces, check settings etc.). The start action will be executed before the first scene is shown.
- Activate Standard command: Usually one of the commands of your interface is the standard command which is set whenever no other command is set. Choose here, if you want to automatically set this standard command after the user performed an action.
- Company name/Game name: This information is used to create a folder where savegames, log files, and config.ini will be saved when running the game. On Windows systems that path would be C:/Users/<username>/AppData/Local/<company_name>/<game_name>. If you don't specify company and game name, the files will be saved in the game's directory instead.
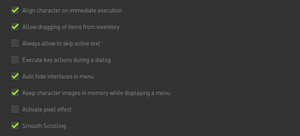
- Align character on immediate execution: If you check this option, the current character will automatically face towards the object when performing an immediate execution action on it.
- Allow dragging of items from inventory: If you check this option, items can be dragged from the inventory, meaning the item becomes the cursor. The item can then be dropped on other items, objects, or characters to combine them.
- Always allow to skip active text: If you check this option, the user can skip displayed text during cutscenes with the left mouse button.
- Execute key actions during a dialog: If you check this option, key actions will be executed during dialogs.
- Auto hide interfaces in menu: If you check this option, interfaces will not show up in menus. Currently visible interfaces will automatically be hidden.
- Keep character images in memory while displaying a menu: If you check this option, all character images and animations will be kept in memory when showing a menu, so they don't have to be reloaded upon return to the previous scene.
- Activate pixel effect: If you check this option, "nearest neighbor" interpolation will be used for image scaling. This is usually desired for low resolution games as it will not blur pixels in fullscreen mode.
- Smooth scrolling: If you check this option, scrolling of wide scenes is softened through motion easing.
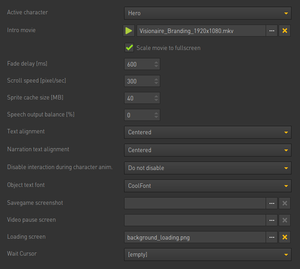
- Active character: Select the character which is playable on game start.
- Intro movie/Scale movie to fullscreen: Add a movie (usually a company splash, preferably Visionaire Studio branding) that will play on game launch (after the loading screen; if provided). Check the option to scale the movie to fullscreen.
- Fade delay [ms]: Set the default time (in milliseconds) that it takes to fade between scenes.
- Scroll speed [pixel/sec]: Set the speed in which large scenes will be scrolled by. A higher value equals faster scrolling.
- Sprite cache size [MB]: Set the sprite cache size (in megabytes), which stores recently loaded sprites.
- Speech output balance [%]: Define how much speech audio output depends on the position of the speaking character. 0% means that the position doesn't matter at all, 100% means that the audio is played only by the left/right speaker, if the character is standing on the left/right side of the screen.
- Text alignment: Define the alignment for text spoken by characters.
- Narration text alignment: Define the alignment for narration text.
- Disable interaction during character anim: Prevent the user from being able to interact while character animations are played.
- Object text font: Set the default font for object text. You can define an individual font for each object text inside the respective action part though.
- Savegame screenshot: Set an image file that serves as the screenshot thumbnail for all savegames when playing on mobile devices (taking in-game screenshots is not possible on mobile devices).
- Video pause screen: Set in image file that serves as a video pause screen.
- Loading screen: Set an image file that serves as a loading screen on game start (before the intro movie).
- Wait cursor: Select the cursor which is shown while the engine is loading data (on scene change).
Action text is the text that displays the current action and/or object names when hovering over or interacting with objects, e.g. "Door", "Look at door", "Use key with door" etc.
- Display: Define if, how and where the action text should be displayed.
- Font: Select the font which should be used to display the action text.
- Rectangle: Define position and size of a box in which the action text should be displayed; only applicable if the Draw action text inside rectangle option was chosen.
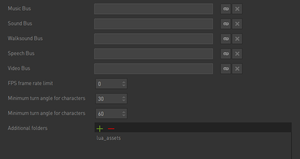
- Music Bus: tbd
- Sound Bus: tbd
- Walksound Bus: tbd
- Speech Bus: tbd
- Additional folders: When building (compiling) the game, only asset files linked somewhere in the editor will be included. If you load files via Lua code, which are not used elsewhere in the project, this might work during development but fail in the final game, when those files are not accessible. That's why you can add additional folders whose files will be included in the game build anyway.
Mouse properties
This section is where you setup global mouse actions. That's things like having the right mouse button always applying the "Look" command or holding the left mouse button display your "coin" style interface. When it comes to interaction with specific objects in your game, you define those mouse actions for the respective objects directly, not in these global settings.
You can setup actions for the following mouse events:
- Left mouse button
- Right mouse button
- Double click of the left mouse button
- Middle mouse button click (not scrolling the wheel)
- Mouse wheel up
- Mouse wheel down
- Left mouse button hold (button pressed)
- Left mouse button hold (button released)
As to the last two events, you can specify the amount of time by which holding of the left mouse button is treated as its own event, in milliseconds ("Time until mouse button hold"). This setting is global, so it applies to individual "hold mouse button" actions for objects throughout your project, too.
Besides the global mouse actions, you may also set the playable character's general reaction to mouse events. In classical third-person point-and-click adventure games, the character always walks to where the user clicks with the left mouse button. If your game has a different approach, you may want to change that behaviour. Define the character's motion for left, right, and middle mouse button click as well as for the "hold mouse button (released)" event by choosing the appropriate "send character" option.
It is possible to change that general behaviour during the game through Lua script. That may come in handy in situations where your character is supposed to temporarily not move for some reason. Have a look at the following example:
-- change the mouse click behaviour: the character will not move on mouse click
game.LeftClickBehaviour = eMouseActionBehaviourDoNotSendCharacter
game.RightClickBehaviour = eMouseActionBehaviourDoNotSendCharacter
Key actions
As for the mouse events, you can define global key actions, too. Add a new action and select the appropriate key you wish to address as the action's execution type. The key selection list contains keyboard keys as well as gamepad keys, both in two variants: "pressed" and "released". You could use this to highlight object hotspots on key press and hide them again on key release, for example.
Game info
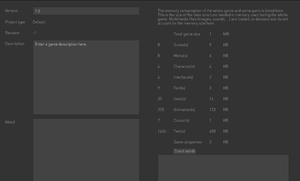
The game info section offers some text fields to enter game version and description. This information is for internal use only; it does not appear anywhere in the final build. There are also some project statistics on the right hand side.
On the left you can enter the various Languages of your game; there must be at least one. It is recommended to use English terms, because the engine will show appropriate flags on text inputs, if it recognizes the language names. As soon as you have added the languages here, you are able to enter translations of your game texts (see the Text page for more on text).
