Difference between revisions of "Animations"
| Line 1: | Line 1: | ||
Animations in Visionaire Studio are made up of image sequences, using .png or .webp image files, and configured in the editor. Pre-made animations like animated .gif files are not supported. You can animate characters of course, have animated scene objects, inventory items, interface buttons, and cursors. | Animations in Visionaire Studio are made up of image sequences, using .png or .webp image files, and configured in the editor. Pre-made animations like animated .gif files are not supported. You can animate characters of course, have animated scene objects, inventory items, interface buttons, and cursors. | ||
| − | Other ways of adding animated content to your scenes are [[ | + | Other ways of adding animated content to your scenes are [[Components|video components]] and [[Particles|particle systems]]. |
| Line 64: | Line 64: | ||
=== Character animations === | === Character animations === | ||
| − | Some special animation features and settings only apply to character animations. See the [[Characters]] page for more about them. | + | Some special animation features and settings only apply to character animations. See the [[Characters#Animations|Characters]] page for more about them. |
| Line 72: | Line 72: | ||
* Animations of [[Scenes and Objects#Object image and animations|scene objects]] have to be started via the [[Action_Parts#Play.2FHide_animation|Play/Hide animation]] action part – unless an animation is set as the "Default animation" of the object. Then it is played automatically from the beginning of the scene. Object animations can be stopped anytime via the action part. The same applies to [[Interfaces|interface button]] animations. | * Animations of [[Scenes and Objects#Object image and animations|scene objects]] have to be started via the [[Action_Parts#Play.2FHide_animation|Play/Hide animation]] action part – unless an animation is set as the "Default animation" of the object. Then it is played automatically from the beginning of the scene. Object animations can be stopped anytime via the action part. The same applies to [[Interfaces|interface button]] animations. | ||
| − | * Most of the [[Characters|character animations]] will play automatically, e. g. a walk animation will play as soon as the character is walking and is replaced by a standing animation when he stops. Only the so-called "Character animations" are individual animations which have to be started/stopped through the action part. | + | * Most of the [[Characters#Animations|character animations]] will play automatically, e. g. a walk animation will play as soon as the character is walking and is replaced by a standing animation when he stops. Only the so-called "Character animations" are individual animations which have to be started/stopped through the action part. |
* [[Cursors|Cursor]] and [[Items|item]] animations play automatically. | * [[Cursors|Cursor]] and [[Items|item]] animations play automatically. | ||
Revision as of 11:09, 24 February 2023
Animations in Visionaire Studio are made up of image sequences, using .png or .webp image files, and configured in the editor. Pre-made animations like animated .gif files are not supported. You can animate characters of course, have animated scene objects, inventory items, interface buttons, and cursors.
Other ways of adding animated content to your scenes are video components and particle systems.
Set up an animation
Animation editor
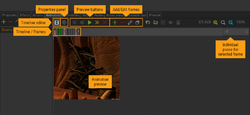
Anywhere you can add an animation to your project, you'll find an animation editor. It consists of two elements: a timeline editor and a properties panel (see image).
The timeline shows a sequence of little vertical bars representing the individual animation frames. The currently selected frame is marked by a black dot, and the viewport below shows the respective image. You can run the animation preview via the green play button.
Add frames
Add a new frame to the animation by clicking the [+] icon and selecting an image file in the dialog that opens up. The new frame will be added to the timeline right after the currently selected frame. In most cases it's easier to import a complete sequence of images at once though. Make sure you have your images numbered sequentially, e. g. "cave_anim_001.png", "cave_anim_002.png" etc. If you click the "Load frame sequence" icon and select one file of your animation, Visionaire will import the whole sequence.
Alternatively, you can drag & drop image files from your file explorer into the animation viewport – this works for single images as well as for a sequence. The new frame(s) will be inserted at the end of the timeline.
The order of frames can be changed by dragging the bars in the timeline.
Clicking the pencil icon lets you change the settings of the selected frame. Besides the image file you can add two more things to a frame via this dialog window: a sound file and/or an action, which both get triggered once the running animation reaches the respective frame. So by using the frame action you can start and control things in your game through an animation. Frames that have a sound file or action added to it, appear green in the timeline.
Arrange frames
It is considered good practice to create all images of an animation (in your animation software) at equal size, because after importing them into Visionaire Studio they're automatically "in place". There may be cases though where you have to rearrange the frames in relation to each other. If you crop character animation frames with transparent backgrounds to reduce file sizes, for example, these images will probably end up having different dimensions.
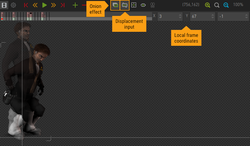
By default, each frame is positioned at local animation coordinates [0,0]. Click the "Displacement input" icon to show the coordinates (see image). By clicking and dragging a frame image in the viewport with the left mouse button, you can change the position of that particular frame. Alternatively use the number input or (after clicking in the viewport) the arrow keys to be more precise. Be aware that dragging with the middle mouse button only pans the viewport (like it would in all other viewports of the Visionaire editor) and does not displace a frame.
To make arranging the frames easier, you can activate the Onion effect. This allows you to show a semi-transparent (ghost) reference frame overlaying the frame you want to edit. Choose the ghost frame by clicking the bottom (light) area of the respective frame bar; it will show a red dot. The example image shows a character animation with frame 11 being selected and frame 1 being shown as reference. While frame 1 is located at [0,0], frame 11 is displaced to [3,67] to visually match the other frame.
Animation center
Some animations require setting an "animation center". That's the point which is used to define the position of the animation.
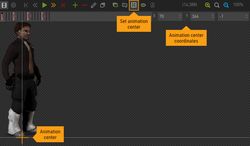
- For characters you have to set the animation center centered between the legs (see image), because that's where the engine calculates the position of a character.
- For cursors the animation center defines the "click point" (the tip of an arrow or the center of a cross, for example).
Click the crosshairs icon and set the animation center by clicking in the viewport or enter the coordinates directly in the number fields.
Animation properties
Open the properties panel to configure how the animation will play.
- Pauses [msec]: Set the time in milliseconds that each frame will be displayed. The lower the number, the faster the animation will run.
- Loops: Define how many times the animation will play, before it is hidden again. Only applicable if "Infinite" is not selected.
- Infinite: Select this option to make the animation run forever (or until it is stopped through some action).
- Play forwards/backwards/in random order: Select the order in which the frames will be displayed when running the animation.
- Random loop pause: Select this option to add a random pause from a range of 5 to 20 seconds between two animation loops.
- Set pause for each frame: Select this option if some of your frames need to show up for a longer/shorter time than others. You have to set a pause in milliseconds for each frame in the timeline editor (see first image on this page). Frames with "-1" will keep the default pause defined in the "Pauses [msec]" setting.
- Position of animation changes vertically: Select this option if your animation changes its position vertically. It will then be taken out of the regular drawing order of scene objects. Only applicable for scene objects.
- Start action after animation is finished: Select an action to execute after the animation has finished playing. If the animation is looping, the action will not get executed after each loop but only after the last one.
Character animations
Some special animation features and settings only apply to character animations. See the Characters page for more about them.
Start/stop an animation
The way animations get started and stopped depends on their type:
- Animations of scene objects have to be started via the Play/Hide animation action part – unless an animation is set as the "Default animation" of the object. Then it is played automatically from the beginning of the scene. Object animations can be stopped anytime via the action part. The same applies to interface button animations.
- Most of the character animations will play automatically, e. g. a walk animation will play as soon as the character is walking and is replaced by a standing animation when he stops. Only the so-called "Character animations" are individual animations which have to be started/stopped through the action part.
- Cursor and item animations play automatically.
Advanced tips & tricks
You can access and manipulate animations through code. See the Animation Tips and Tricks page for some examples.


