Getting Started with the Visionaire Studio Editor
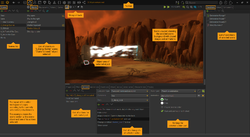
The Visionaire Studio editor is your development environment. It features several sections representing the various elements of your game, e. g. scenes, characters, interfaces etc. Each section offers a user interface consisting of resizeable panels containing different settings, options and viewports. It is one of the major advantages of Visionaire Studio that new users are not confronted with a code editor right away, but can intuitively start playing around with the settings, adding resources, and creating actions.
Home screen
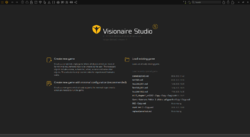
The home screen opens up when you launch the Visionaire Studio editor. It is where you can start a new blank project, or start a new project with a premade template that includes all the things required for the game to run, or select an existing project from the recent projects list.
If you are new to Visionaire Studio, it is recommended to start with the minimal configuration project and learn how it works.
| Almost unnoticed, the built-in minimal configuration game in Visionaire has been slightly broken for some time. Until this is fixed, you can download a fixed version here. |
Project file & folder structure
When starting a new project, the editor first asks you to save it somewhere. A Visionaire project is saved as .ved, which is basically an XML file. Alternatively, you can choose to save it as .veb, which is significantly smaller in file size but written in non-human-readable binary format.
Keep in mind that you have to save all the resources (graphics, sound files, videos etc.) you wish to use in your project in the same folder as your project file. Visionaire will only save relative paths and not go up the file tree. It is recommended to create a structure of sub-folders in the project root folder for your resources. See this page for tips on the file hierarchy.
| With the .ved file being XML, you are technically able to modify it with a text editor (e. g. batch change the name of a resource file that you have linked multiple times), but this is generally not recommended. Do so at your own risk, if you REALLY know what you're doing, and always remember to backup your project first. |
Project Toolbar
The project toolbar at the top of the editor contains options & tools for your game project, the editor itself, and buttons that link to the various different sections of the Visionaire Studio editor.
On the left: tools to create your game
| Menu: This is where you can access the project file options, various editor related tools, & editor preferences, etc. | Read more... | |
| Home: This is where you can start a new game dev project or load an existing one. | Read more... | |
| Back: Works similar to the back button on an internet browser (not the undo button). | ||
| Forward: Works similar to the forward button on an internet browser (not the redo button). | ||
| |
Game properties: This is where you define the main settings for your game development project. | Read more... |
| |
Scenes: This is where you create, build, & setup playable scenes, your main menu, option menu, save/load menu, cutscenes, interaction events, scene objects, images, & animations, etc. | Read more... |
| |
Characters: This is where you create & setup your playable & non-playable (npc) characters. | Read more... |
| |
Interfaces: This is where you create & setup your command interface & on-screen interfaces, such as: the inventory, GUI elements, etc. | Read more... |
| |
Items: This is where you create & setup items that can be picked up & stored in the inventory, combined with other items, or given to other characters, etc. | Read more... |
| |
Cursors: This is where you create & setup mouse cursors that will be used for your game. | Read more... |
| |
Fonts: This is where you create & setup the text fonts that will be used for your game. | Read more... |
| |
Scripts: This is where you can create & write definition or execution based Lua scripts for your project. | Read more... |
| |
Particles: This is where you can create particles systems for your game, such as rain, snow, smoke, etc. | Read more... |
| |
Texts: This is where you can find all texts related to your game project, such as: display texts, narration texts, object texts, visobj names, etc. You can also modify the texts via this tab. | Read more... |
| |
Shaders: This is where you can create & write custom openGL shader effects for your game. | Read more... |
| |
Audio: This is the audio system tab which will allow you to create playlist mix containers, volume channels, automations, & sound effects, etc. that can be manually played or assigned to scenes. | Read more... |
| |
Visual Scripting: This is the visual scripting tab, which lets you create node based visual scripting blocks via contextual menus; for people that don't want to learn how to script, or type out code. | Read more... |
On the right: tools to search, test, debug, and extras
| |
Run game: Drops down various options to do with running your game project. | Read more... |
| |
Run game on current scene: Drops down various options to do with running your game project on the currently selected scene in the scenes tab (defaults to initial scene if no scene is selected). | Read more... |
| |
Search bar: Allows you to search for anything in your project that is relevant to the search term. | Read more... |
| |
Debug: tbd | |
| |
Profiler: tbd | |
| |
Plugins: This tab will let you install, remove, activate, & deactivate action part plugins that you have manually downloaded (or created yourself) & added to the "plugins" folder in the root folder of your game project. | Read more... |
Menu
File
| New: Create a new empty Visionaire Studio project. | ||
| Load: Load an existing Visionaire Studio project. | Ctrl+O | |
| Save: Save the current Visionaire Studio project. | Ctrl+S | |
| Save as...: Save the current Visionaire Studio project under a new file name. | ||
| Save and run: Save the current Visionaire Studio project and run it. | Ctrl+F9 | |
| Save as 'filename0001.ved': Save the current Visionaire Studio project under a new file name, made up of the current file name and a revision number. | ||
| Export team file...: Export a team file from this master project to let multiple users work on the same project in parallel. | Read more... | |
| Import team file: Import a previously exported team file back into the master file while merging the edits of both files. | Read more... | |
| Quit: Quit Visionaire Studio. |
Tools
| Undo: Undo the last edit. | Ctrl+Z | |
| Redo: Reverse the undo. | Ctrl+Y | |
| Command list...: Opens a list of all recent edits. | Ctrl+H | |
| Explorer: Opens the explorer dialog which lets you view (and edit) the data structure of the project. Only change things, if you REALLY know what you are doing. | Ctrl+E | |
| Build game: Compile the game for release on various platforms. (only available in registered version, needs license purchase) | Ctrl+B | Read more... |
| Generate action names: Regenerates the internal action names according to the currently active language. | ||
| Generate action part names: Regenerates the internal action part names according to the currently active language. | ||
| Generate dialog layer names: Regenerates the internal dialog layer names according to the currently active language. |
Extras
| Export texts...: Export all texts into a text or spreadsheet file e. g. for translation purposes. | Read more... | |
| Import texts...: Import a (previously exported) text or spreadsheet file after editing/translation. | Read more... | |
| Import speech files...: Import speech files. The sound files have to be named to match the text ids. | ||
| Integrity check...: Check the integrity of the project file. | ||
| Check for update...: Check the Visionaire server for the latest software version. | ||
| Options...: Open the editor options window. | Read more... | |
| Register editor...: Enter your license details to register the full version of Visionaire Studio (only available in unregistered version, needs license purchase) | ||
| Run game: Run the game. | F9 | Read more... |
Help
| Help: Open the Visionaire Studio Wiki in your browser. | visionaire-tracker.net |
| Visionaire Website: Open the Visionaire website in your browser. | visionaire-studio.net |
| Visionaire Forum: Open the Visionaire forum in your browser. | visionaire-studio.net/forum |
| About...: Open a window with information on the editor version. |
Editor options
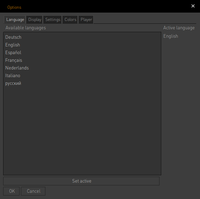
The options dialog is accessible from the menu ("Extras > Options..."). It offers various settings to customize the editor (not the game project). These settings are not saved within the project but are global.
Language tab
Choose the language used for the user interface. Select one of the available languages and click "Set active". Most parts of the editor will switch to that new language immediately – just change to another section to see the effect. The menu however needs a restart of the editor.
Display tab
- Enable "Automatically zoom out view if image is too large" to not display large images at 100% in the viewport by default. For example, scene background images are usually larger than the editor viewport, and by enabling this option the editor will make them fit (completely visible) by default.
- Enable "Show selection dialog for new action part" to open the action part selection dialog window whenever you add a new action part to one of your actions.
- Show text for current object selection: tbd
- Show volumes in percent: Changes the display of volume settings in several sections of the editor from decibel (dB) to percent (%). Note that after switching to percent, the precision is still oriented towards dB, e. g. you won't really hear the difference in the area of 100% to 90% as this corresponds to 1 dB only. So the fader jumps a bit.
Settings tab
- Adjust the mouse wheel behaviour for zoom and scroll operations.
- With "Precision for direction selection (in °)" you can adjust the behaviour of the alignment widget which lets you control the facing direction of your characters when approaching objects. The default value of 45° results in 8 possible directions.
- Enable "Set object center automatically" to automatically set the object center of a scene object to the bottom of the respective object image or animation, whenever you add or move said image/animation. Experienced users tend to disable this option to avoid accidental changes of object centers. Depending on the geometry of the object, the auto value might be wrong.
- Enable "Create 'Display text' action part automatically" to automatically add an action part of the "Display text" type when adding a new action part instead of having to choose a type. Since "Display text" is the most used action part in most adventure games, this option may be useful.
- Enable "Show object path as tool tip for linked objects" to easily get the object path of an object within the project's data structure. The object is accessible via this path through scripting.
- Activate debug output: tbd
- Override DPI: tbd
- Default pause: Default value for the Pause action part.
Colors tab
Change the colors of way points (and the paths between them) as well as other selections in the viewport, such as savegame areas.
Player tab
These are the options for starting the game from the editor. The settings basically correspond to the command line parameters which are available for starting a Visionaire game.
Search & find
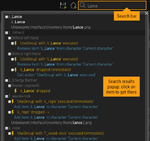
Visionaire offers a full-text search. Use the search bar in the project toolbar to search for any word – be it an internal object name or part of a text spoken by a character. The search results will open in a popup (see image). Clicking on one of the results will take you to the respective object within the editor workspace.
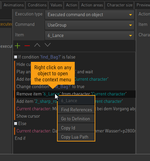
Other useful search features are offered via context menu. You can open the context menu by right-clicking on an object anywhere within the editor (see image). Choose "Find References" to list all references to that object within the project in the search result popup, so you get an overview of where you used that object. Choose "Go to Definition" in the context menu to quickly jump to the area of the workspace where you added the respective object.
Change & reset your workspace
You can change the size of all the UI panels in the editor. The editor will save and remember the panels' dimensions when launched again. If you accidentally mess up anything (e. g. panels disappear), you can right click on the relevant section button on the project toolbar & click on the "Reset workspace" option to reset it back to default.
Run your game
You can run the game at any time from within the editor by pressing the F9 key (or Ctrl+F9, if you want to save the project first). You find these commands in the menu as well. Player options can be defined on the "Player" tab of the options window.
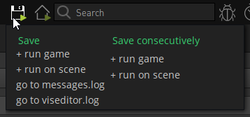
The running commands are also available as shortcuts in the project toolbar next to the search bar (see image). The little dropdown offers options to run the game on the currently selected scene and to save the game consecutively, meaning the project will be saved under a new file name containing a revision number before running it. Besides that, the dropdown features shortcuts to the log files of the game (messages.log) and the editor (viseditor.log) – the first one being the place to look for errors in your game, especially when writing scripts.
Once you finished developing you're probably going to compile/build your game into a standalone application that is able to run on its own, without the need to have the editor installed.
