Verb Coin Interface Tutorial Part 1
| Name | Part | By |
|---|---|---|
| Set up a verb coin interface with screen-centered inventory (MI3 style) | Part 1 of 2 | Einzelkämpfer |
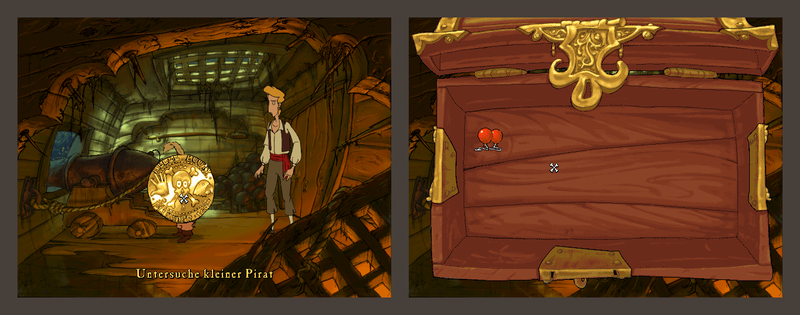
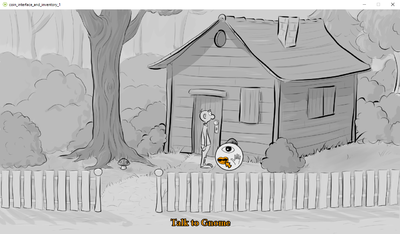
This tutorial describes how to set up a verb coin interface together with an inventory that appears in the center of the screen – very much like what you find in the 1997 adventure game, The Curse of Monkey Island (MI3). We're not going to recreate the MI3 controls in all their details, but the basic mechanism will be the same.
This is a 2 part tutorial:
- Part 1 (this page) covers the basics: setting up the coin interface and the inventory. There is no scripting involved in this part. Everything is done with Visionaire's settings and action system only.
- Part 2 completes the action text part of the MI3 example, because at the end of part 1 we'll see that it is not fully working as desired yet. It also adds more command variety, because in MI3 the commands vary depending on the object they are used on. The parrot depicted on the verb coin can mean "Talk" or "Eat" or "Blow", for example. We have to use some Lua script here – and a bit of fiddling.
You can download the project files at the bottom of both tutorial pages. Most of the graphics were created by Esmeralda for her menu tutorial.
Part 1 // Part 2
About the Monkey Island 3 controls
This is how the interface in MI3 works:
- The command interface is a verb coin containing three command buttons: hand (Take, Push, Use), skull (Look), and parrot (Talk, Eat, Drink, Blow, Bite). Clicking on an object or character with the left mouse button and holding that button for some time opens the coin underneath the cursor. While still holding the button, the user can execute the desired action by releasing the mouse button on the command. The coin will disappear.
- The inventory opens via right click. It is centered on the screen, with the scene being visible behind it. If you click on one of the items, the item graphic becomes the cursor. Moving the cursor out of the inventory will close the latter. You can apply a dragged item on an object by clicking on it.
- When hovering over an object, character or item, the cursor changes its colour and the action text appears at the bottom of the screen.
General GUI elements
Cursor
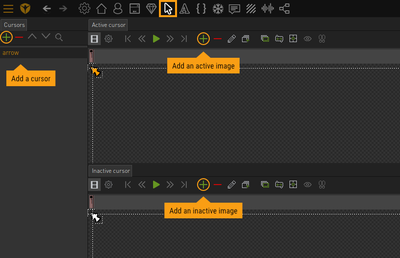
- In the "Cursors" section add a new cursor and name it "arrow".
- Add one frame to the "Active cursor" animation and select the active cursor image (orange). Set the animation center to the tip of the arrow.
- Do the same for the "Inactive cursor" animation, but with the inactive cursor image (white).
Fonts
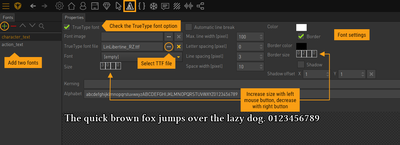
- In the "Fonts" section add a new font and name it "character_text".
- Check the "TrueType font" option and link the "TrueType font file".
- Style the font: Size = 30, Letter spacing = 0, Color = white (ffffff), Border = 2, no shadow
- Duplicate the font and name the new one "action_text".
- Change the color of "action_text" to orange and keep the other settings.
Action text
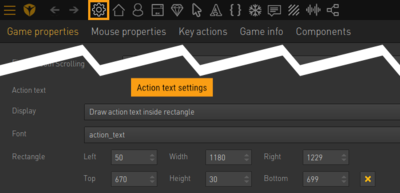
- In the "Game properties" select "Draw action text inside rectangle" as the action text display option.
- Select the "action_text" font for the action text.
- Enter the following values to define the action text rectangle (these values fit for our 1280 x 720 pixel resolution): Left = 50, Width = 1180, Top = 670, Height = 30. The action text will now be displayed at the bottom of the screen, centered in the defined rectangle.
Verb coin interface
Basic interface settings
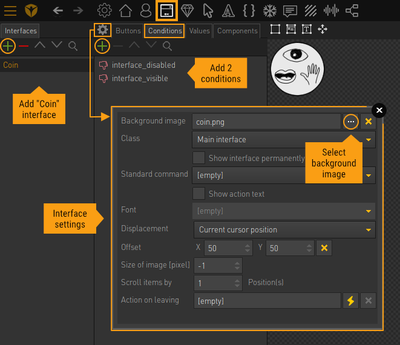
- Add a new interface and name it "Coin".
- Add 2 conditions "interface_disabled" and "interface_visible" to the interface, both set to false by default.
- In the interface settings add the background image.
- Make sure "Main interface" is set as the interface class.
- Set "Displacement" to "Current cursor position" and enter an offset of X = 50 and Y = 50. The offset shifts the interface 50 pixels to the left and 50 pixels to the top from the cursor's position, thus centering the 100 x 100 pixel interface behind the cursor when it opens up.
Show the interface
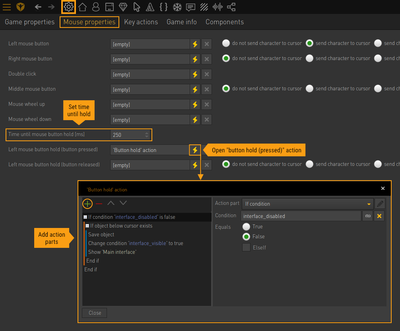
We want to show the coin interface when the user clicks on an object and holds the mouse button. So we have to set up a global mouse behaviour in the "Mouse properties" of the "Game properties" section.
- Set "Time until mouse button hold" to 250 ms.
- Open the action for "Left mouse button hold (button pressed)" and add the following action parts:
- If condition: select the "interface_disabled" condition and "false". The following action parts will only be executed, if the interface is not disabled. We will not disable the interface in this tutorial, so that query (and the condition) are not really needed. But it is always a good idea to have the option to disable the interface during the game just by changing a condition.
- If current object...: select "Object exists". This ensures that the coin interface will open up only when the user clicks (and holds) on an object, item or character.
- Save object: This tells the engine that the current object is the one we are about to perform an action on. A reference to that object is stored internally so that a command can be executed on it later.
- Change condition: select the "interface_visible" condition and set it to true.
- Show/Hide interface: show the "Main interface" class.
- End if
- End if
Hide the interface
There are three different scenarios to hide the interface again: (1) when the cursor leaves the interface area without executing a command; (2) when the user releases the mouse button while hovering over an empty area of the coin, not over a command button, thus not executing a command; (3) when the user releases the mouse button while hovering over a command button, thus executing a command.
Scenario (1) requires the engine to detect the cursor leaving the interface:
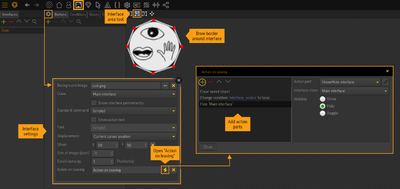
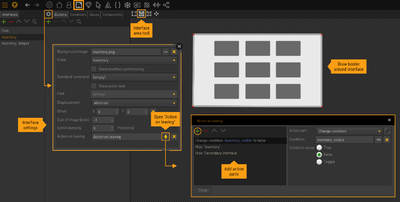
- Activate the interface area tool and create the border around the interface in the viewport. Otherwise the engine would recognize the whole rectangular border box of the background image (including the transparent parts) as the interface.
- In the interface settings open the "Action on leaving" and add the following action parts:
- Clear saved object: removes any reference to the object.
- Change condition: select the "interface_visible" condition and set it to false.
- Show/Hide interface: hide the "Main interface" class.
Scenario (2) is handled in the global mouse properties:
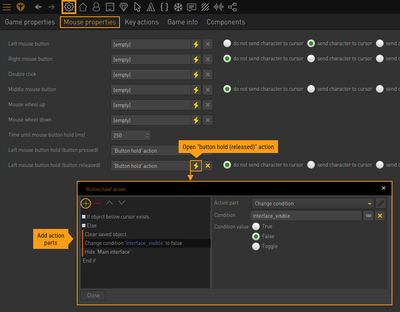
- Open the action for "Left mouse button hold (button released)" and add the following action parts:
- If current object...: select "Object exists". The object mentioned here is not the scene object the user clicked on to open the interface, but one of the three command buttons on the interface which also get recognized as objects. Since we only want to do something, if the cursor does not hover over one of the buttons and there is unfortunately no action part "If current object is not..." available, we add an "Else" action part immediately after the "If" to negate it.
- Else
- Clear saved object: removes any reference to the object.
- Change condition: select the "interface_visible" condition and set it to false.
- Show/Hide interface: hide the "Main interface" class.
- End if
Scenario (3) is handled within the command button actions (see below).
Command buttons
Interface command buttons are not only buttons to click on, but at the same time they provide the commands which are available for the user in the game. Besides the three visible buttons (Look, Talk, Use), we need a fourth command which will be our "Standard command", i. e. it is active whenever no other command is active. This command is used to walk around the scene and to drag items from the inventory (this will change in part 2 of this tutorial though).
Standard command
- In the "Game properties" check the option "Allow dragging of items from inventory". This will enable Visionaire's item-dragging system. Also make sure that "Activate standard command" is set to "Only after successful execution".
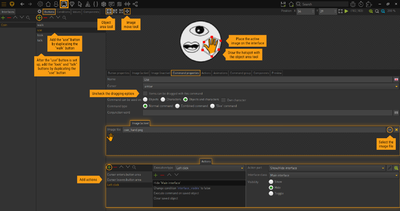
- Add a button to the "Coin" interface and name it "walk".
- In the "Button properties" choose "Command button" as "Button type".
- In the "Command properties" leave the name empty, set the "arrow" cursor and the command to be used on "Objects and characters". Check the option "Items can be dragged with this command".
- In the interface settings select the "walk" command as the standard command.
Three game commands
- Duplicate the "walk" button and name the new one "use".
- In the "Command properties" enter "Use" as the name and uncheck the dragging option.
- Add the hightlight image of the hand icon on the "Image (active)" tab and move it to its position on the interface by activating the move tool and dragging the image in the viewport.
- Activate the object area tool and create the hotspot around the "use" button icon.
- On the "Actions" tab add a new action with execution type "Cursor enters button area" and add the following action parts:
- Set active/inactive image: link the "use" button and select "Active image".
- Set command: select the "use" command. The reason for setting the command on hovering over the button already is that the action text will change instantly, i. e. if the user hovers over the hand icon, the action text will change from "[Object]" to "Use [Object]".
- Add an action with execution type "Cursor leaves button area" and add the following action parts:
- Set active/inactive image: link the "use" button and select "Inactive image". We haven't linked an inactive image, because the inactive state is already painted onto the interface background, but this action part will hide the active image.
- Set command: select "Standard command".
- Add an action with execution type "Left click" and add the following action parts:
- Show/Hide interface: hide the "Main interface" class (this is the third scenario of hiding the interface mentioned above).
- Change condition: set the "interface_visible" condition to false.
- Execute command on saved object
- Clear saved object: removes any reference to the object.
- Duplicate the "use" button twice and name the new ones "look" and "talk", respectively.
- In the "Command properties" enter "Look at" and "Talk to" as the name, respectively.
- Adjust the settings of the new buttons (active image, object area, actions).
Inventory interface
Basic interface settings
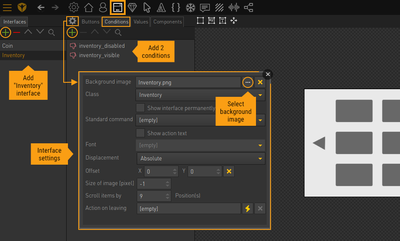
- Add a new interface and name it "Inventory".
- Add 2 conditions "inventory_disabled" and "inventory_visible" to the interface, both set to false by default.
- In the interface settings add the background image.
- Select "Inventory" as the interface class.
- Set "Displacement" to "Absolute" and leave the offset at X = 0 and Y = 0. Since we created our interface at game resolution (1280 x 720 pixel with transparent area around the actual interface), we have to place it at the top left corner.
- Set "Scroll items by" to 9.
Our inventory does not cover the entire screen, but takes up only the central part of it. Our scene is visible behind it. That means we have to prevent interaction with the scene while the inventory is shown. Otherwise you could walk the character or even execute commands on scene objects with the inventory being visible.
That's why we'll add another interface. This one will only contain a transparent background image at the size of the game resolution, and it will be shown behind our inventory. Since it is transparent, you won't see a difference, but it blocks the user from interacting with the scene. So whenever we show/hide the inventory, we also have to show/hide this helper interface.
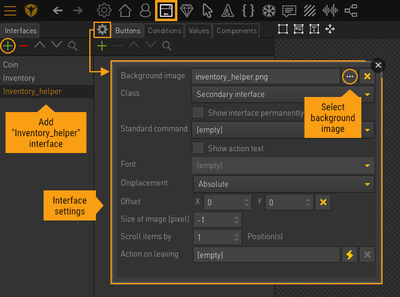
- Add a new interface and name it "Inventory_helper".
- In the interface settings add the transparent background image.
- Select "Secondary interface" as the interface class.
- Set "Displacement" to "Absolute" and leave the offset at X = 0 and Y = 0.
Show (and hide) the interface
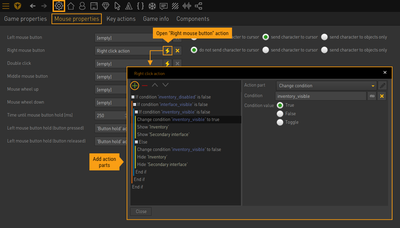
We want to show the inventory when the user clicks the right mouse button anywhere in the scene. So we have to set up a global mouse behaviour in the "Mouse properties" of the "Game properties" section. But we also want to hide the inventory via right click, if it is already visible.
- Open the action for "Right mouse button" and add the following action parts:
- If condition: select the "inventory_disabled" condition and "false". The following action parts will only be executed, if the inventory is not disabled. Just like for the coin interface, we added this query to be able to disable the inventory in the course of the game. We'll not use that option in this tutorial.
- If condition: select the "interface_visible" condition and "false". We don't want to show the inventory when the verb coin is already visible. The user would have to click the right mouse button while holding down the left button to achieve this – which is unlikely. But it's not impossible, so we prevent it.
- If condition: select the "inventory_visible" condition and "false". A right click should show the inventory, but it should also hide it, if it is already visible. So we need to switch cases here.
- Change condition: select the "inventory_visible" condition and set it to true.
- Show/Hide interface: show the "Inventory" class.
- Show/Hide interface: show the "Secondary interface" class.
- Else
- Change condition: select the "inventory_visible" condition and set it to false.
- Show/Hide interface: hide the "Inventory" class.
- Show/Hide interface: hide the "Secondary interface" class.
- End if
- End if
- End if
Hide the interface
The second scenario for hiding the inventory is by leaving the interface area:
- Activate the interface area tool and create the border around the inventory in the viewport (that's the visible inner part of the inventory only of course).
- In the interface settings open the "Action on leaving" and add the following action parts:
- Change condition: select the "inventory_visible" condition and set it to false.
- Show/Hide interface: hide the "Inventory" class.
- Show/Hide interface: hide the "Secondary interface" class.
Item placeholders
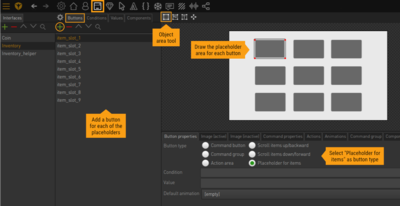
- Add a button to the "inventory" interface and name it "item_slot_1".
- In the "Button properties" choose "Placeholder for items" as "Button type".
- Activate the object area tool and create the placeholder around the first rectangle.
- Repeat this for the remaining 8 slots.
Scroll buttons
The engine will show the scroll buttons only, if the inventory contains more items than placeholders.
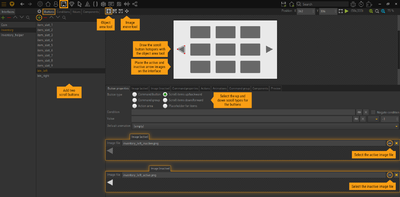
- Add a button to the "inventory" interface and name it "btn_left".
- In the "Button properties" choose "Scroll items up/backward" as "Button type".
- Add the arrow image on the "Image (inactive)" tab and move it to its position on the interface by activating the move tool and dragging the image in the viewport.
- Add the hightlight image on the "Image (active)" tab and move it to the same position as the regular image.
- Activate the object area tool and create the hotspot around the arrow button.
- Repeat this for the right scrolling button ("Scroll items down/forward" as "Button type").
Initialize interfaces
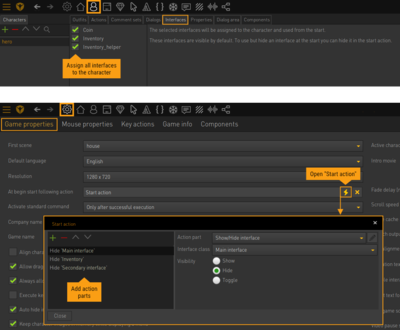
In order to use our interfaces, we have to assign them to our playable character. And we must hide them at game start.
- In the "Characters" section select the playable character, switch to the "Interfaces" tab and check all three available interfaces.
- In the "Game properties" open the start action ("At begin start following action") and add the following action parts:
- Show/Hide interface: hide the "Main interface" class.
- Show/Hide interface: hide the "Inventory" class.
- Show/Hide interface: hide the "Secondary interface" class.
How to work with the commands
The project file(s) for this tutorial contain(s) a small scene with some objects and items, showing you how to use the commands. Add an action to the object and choose "Executed command on object" as execution type. Then select the respective command and create your action by adding the action parts. If you want to add an action for using an item on the object (e. g. "Use Key with Door"), choose "Item dropped" as execution type and select the item.
Are we done?
Since you know that this is only the first part of the tutorial, we're obviously not. If you start the game from the project file 1, you will notice that everything works great except for the action text. While it doesn't have any problems with our three commands, dragging and using an inventory item does not change the action text. We would like to read "Use Key with Door", but instead we only see "Key" or "Door". We will fix that in part 2.
Part 1 // Part 2
Resources
| Name | Description |
|---|---|
| vistut_verb_coin_interface_and_inventory.zip | Project files for this tutorial (created with Visionaire Studio 5.1.9.2) |
