Verb Coin Interface Tutorial Part 2
| Name | Part | By |
|---|---|---|
| Set up a verb coin interface with screen-centered inventory (MI3 style) | Part 2 of 2 | Einzelkämpfer |
This tutorial describes how to set up a verb coin interface together with an inventory that appears in the center of the screen – very much like what you find in the 1997 adventure game, The Curse of Monkey Island (MI3). We're not going to recreate the MI3 controls in all their details, but the basic mechanism will be the same.
This is a 2 part tutorial:
- Part 1 covers the basics: setting up the coin interface and the inventory. There is no scripting involved in this part. Everything is done with Visionaire's settings and action system only.
- Part 2 (this page) completes the action text part of the MI3 example, because at the end of part 1 we'll see that it is not fully working as desired yet. It also adds more command variety, because in MI3 the commands vary depending on the object they are used on. The parrot depicted on the verb coin can mean "Talk" or "Eat" or "Blow", for example. We have to use some Lua script here – and a bit of fiddling.
You can download the project files at the bottom of both tutorial pages. Most of the graphics were created by Esmeralda for her menu tutorial.
Part 1 // Part 2
What to do (1)
We start where we left off in part 1. The action text doesn't work well for our dragging command. And that's no surprise, because our standard "walk" command which is used for dragging items neither has a name nor a conjuction word ("...with...") defined in the command properties. And that's perfectly fine in most cases. But we want to show sentence-like action text in our game, so we need to change our setup slightly.
We can't just name our standard command "Use", because that would be displayed all the time when walking through the scene. And we also can't utilize our regular "Use" command for dragging items from the inventory, because we still need the option to apply this regular "Use" command to an item. These requirements would interfere with each other (believe me, I tried it, it doesn't work). Besides, we will modify our three commands later anyway.
The solution is a fifth command, solely used for dragging items.
Add a new dragging command
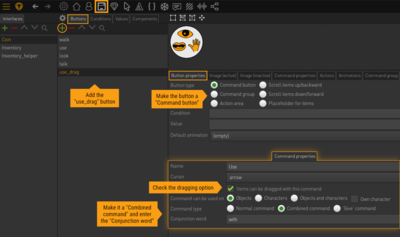
- In the "Coin" interface add a new button and name it "use_drag".
- In the "Button properties" choose "Command button" as "Button type".
- In the "Command properties" enter "Use" as the name, set the "arrow" cursor and check the option "Items can be dragged with this command".
- Change the "Command type" to "Combined command" and enter "with" as the "Conjunction word".
Keep the dragging option checked for the "walk" command, too. I will explain later.
Activate/Deactivate the dragging command
The "use_drag" command has only one purpose: drag the items from the inventory. So it needs to be active inside the inventory, and be deactivated outside of it – unless it drags an item out. Let's see where we need to set the drag command and the standard command, respectively, to achieve this.
Show and hide the inventory
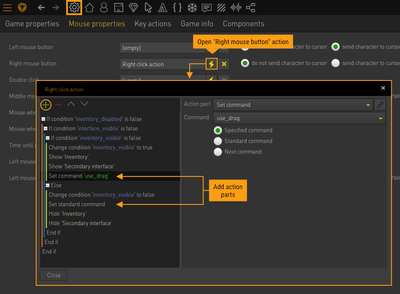
- In the global right click action, add the following action parts:
- Right underneath "Show Secondary interface" add Set command and select the "use_drag" command.
- Right above "Hide Inventory" add Set command and select "Standard command".
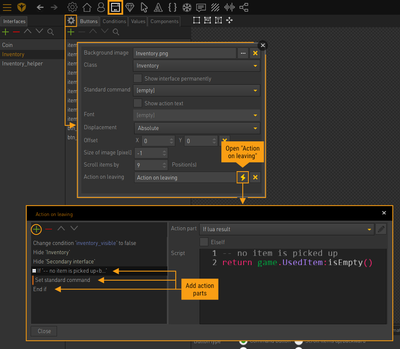
Another way to hide the interface is by leaving it with the cursor. We have to differentiate between just leaving and dragging an item out of the inventory. In the latter case we must not set the standard command.
- In the interface settings of the "Inventory" open the "Action on leaving" and append the following action parts:
- If lua result: enter
return game.UsedItem:isEmpty(). The following action parts will only be executed, if no item is currently dragged. - Set command: select "Standard command".
- End if
Coin operations
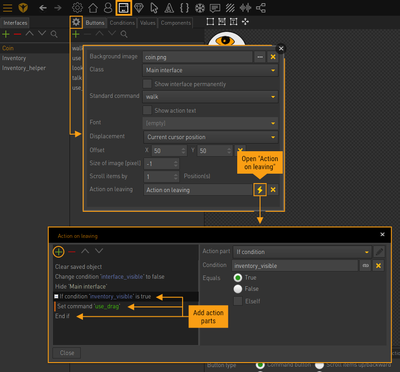
- In the settings of the "Coin" interface open the "Action on leaving" and append the following action parts:
- If condition: select the "inventory_visible" condition and "true". The following action parts will only be executed, if the inventory is visible.
- Set command: select "use_drag".
- End if
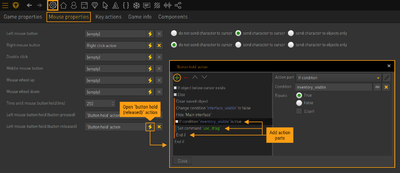
- Open the action for "Left mouse button hold (button released)" and add the following action parts right underneath "Hide Main interface":
- If condition: select the "inventory_visible" condition and "true". The following action parts will only be executed, if the inventory is visible.
- Set command: select "use_drag".
- End if
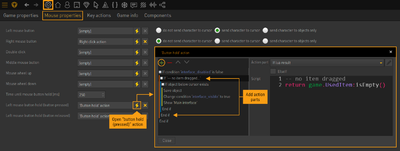
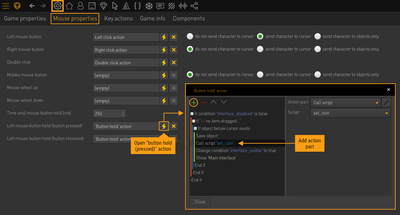
- Open the action for "Left mouse button hold (button pressed)" and add the following action parts:
- If lua result: enter
return game.UsedItem:isEmpty(). The coin will only show, if we don't have an item dragged. That seems like a good idea anyway and solves the problem of setting the right command easily.
- End if
Drop item on item
After successful execution of an action, the standard command is automatically set. If we drop an item on another item in the inventory however, we need to keep the "use_drag" command set, because the inventory will stay visible. Unfortunately, there is no way to globally detect a successful execution. But it turned out that it is enough to just handle left clicks in general: whenever the user clicks with the left mouse button inside the inventory, the drag command is set – unless the coin is visible.
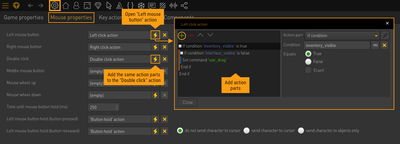
- Open the action for "Left mouse button" and add the following action parts:
- If condition: select the "inventory_visible" condition and "true".
- If condition: select the "interface_visible" condition and "false".
- Set command: select "use_drag".
- End if
- End if
- Add the exact same action parts to the global "Double click" action as well. This is necessary because the action of the item on item operation gets executed by double click, too. Evil trap.
Release the dragged item on right click
Now for one of those nasty issues that are easily overlooked.
A click with the right mouse button releases a dragged item from the cursor and aborts that operation without executing an action. This behaviour is built into Visionaire and can't be changed (well, maybe it can be changed, but I have no idea how; and we actually don't want to change it at all). If our cursor hasn't left the inventory yet, this doesn't cause any problems. However, if we right-click after dragging the item out of the inventory, the item disappears (as expected), but the "use_drag" command stays active, because no action has been executed. That command is of no use outside of the inventory and we need to activate the standard command instead.
Again, there is no way to directly detect when a dragged item has been released from the cursor. We also can't utilize the global right click action, because it doesn't get executed in that case. So let's fiddle with Lua code.
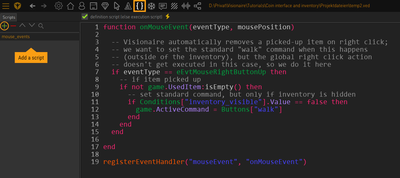
- Add a new Lua script and name it "mouse_events".
- Make sure that the "definition script" option is checked, and add the following code:
function onMouseEvent(eventType, mousePosition)
  if eventType == eEvtMouseRightButtonUp then
    if not game.UsedItem:isEmpty() then
      if Conditions["inventory_visible"].Value == false then
        game.ActiveCommand = Buttons["walk"]
      end
    end
  end
end

registerEventHandler("mouseEvent", "onMouseEvent")
The last line tells the engine that we want to register an event handler for the mouse events. That means that whenever the user moves the mouse or clicks or scrolls, the function "onMouseEvent" is called. This is a custom function and we are free to do whatever we want inside it. It's worth mentioning that this mouse event is triggered before Visionaire does anything else, so in our case our function is executed before the Visionaire player releases the dragged item.
- The line starting
if eventType...checks for the mouse action. We only want do do something for right click. - The line starting
if not game...checks if an item is currently dragged. - The line starting
if Conditions...checks if the inventory is currently hidden. - The line starting
game.ActiveCommand...sets the standard command.
Not important but interesting: If you are curious why we kept the ability to drag items with the standard "walk" command... The moment we set the standard command on right click in our script above, we would already release the dragged item, if the standard command wasn't able to hold it. The release of the item was about to happen anyway, so that doesn't seem to make much of a difference. But when the Visionaire player continues and there is no item to release anymore, it will execute the global right click action, showing the inventory. That's not what we want in this case. Wasn't interesting? – Sorry, now it's too late to not read it.
What to do (2)
Now for the final step of this tutorial. As said before, the command buttons in MI3 are context-sensitive. The hand icon, for example, stands for "Take", "Push", or "Use", depending on the object it is applied to.
To recreate this, we will add command buttons for all possible commands and enable only the ones that apply to the current object. The "Look" command will stay the only command for the eye icon, but we will add several new commands for the hand and mouth icons.
Add more commands
- Add two values to the coin interface and name them "which_hand_command" and "which_mouth_command", respectively. Set their value to 1. Those values will control which of the hand commands and which of the mouth commands are currently enabled.
- Rename the "use" command to "hand_1_use". It will become our first hand command, thus being enabled by default.
- In the "Button properties" link the "which_hand_command" value and make it validate for "= 1".
- Duplicate the "hand_1_use" button twice and rename the new buttons "hand_2_take" and "hand_3_push". By duplicating the buttons you also duplicate all the settings including the image and object area. That saves you a lot of hassle.
- In the "Button properties" of the new buttons make the value validate for "= 2" and "= 3", respectively.
- In the "Command properties" name the new buttons "Take" and "Push", respectively.
- Repeat all this for the mouth buttons, bind them to the "which_mouth_command" value. The "talk" command will become "mouth_1_talk", the other buttons are "mouth_2_eat", "mouth_3_drink", "mouth_4_blow", and "mouth_5_bite".
Enable/Disable commands
Now how do we enable/disable certain commands depending on the object we click on? – The idea is to add a value called "set_hand" and/or "set_mouth" to the object and set the value of the command we wish to have available. So for the mushroom in our project file, we would add a "set_hand" value with a value of 2, and when we now open the verb coin on the mushroom, the hand command is "Take" instead of "Use". We don't have to add values to all of our objects though. If no value is found, the default command is enabled: "Use" and "Talk", respectively.
To make the whole thing work we need another script:
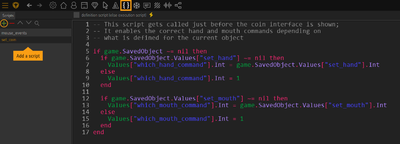
- Add a new Lua script and name it "set_coin".
- Uncheck the "definition script" option, and add the following code:
if game.SavedObject ~= nil then
  if game.SavedObject.Values["set_hand"] ~= nil then
    Values["which_hand_command"].Int = game.SavedObject.Values["set_hand"].Int
  else
    Values["which_hand_command"].Int = 1
  end

  if game.SavedObject.Values["set_mouth"] ~= nil then
    Values["which_mouth_command"].Int = game.SavedObject.Values["set_mouth"].Int
  else
    Values["which_mouth_command"].Int = 1
  end
end
- The line starting
if game.SavedObject ~=...checks if an object has been saved for execution at all. - The following if query block looks for a value named "set_hand" attached to the object and sets "which_hand_command" to that value if found. If "set_hand" is not found, the default value of 1 ("Use" command) is set.
- The lower block of code lines does the same for the mouth commands.
We have to call that script right before showing the verb coin:
- Open the action for "Left mouse button hold (button pressed)" and add the following action part right underneath "Save object":
- Call script: select the "set_coin" script.
How to work with the commands
It's as simple as it can be. If you want to use the "Take" command instead of the default "Use" command on the mushroom, add a value named "set_hand" to the mushroom object and set it to 2. Then add an action with execution type "Executed command on object" and select the "hand_2_take" command. It is even possible to change the "set_hand" value on runtime, if you want to treat an object in different ways as the game progresses.
In the project file I added the following example actions:
- You can "take" the mushroom using the hand command.
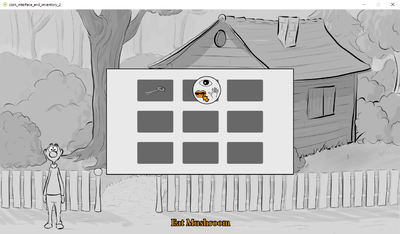
- You can try to "eat" the picked-up mushroom in your inventory using the mouth command.
- You can try to "take" the gnome. Once you did that und use the hand command again, you try to "push" him.
Are we done now?
I think so.
Part 1 // Part 2
Resources
| Name | Description |
|---|---|
| vistut_verb_coin_interface_and_inventory.zip | Project files for this tutorial (created with Visionaire Studio 5.1.9.2) |
