Difference between revisions of "Particle System"
| (3 intermediate revisions by the same user not shown) | |||
| Line 46: | Line 46: | ||
* <span class="inlinecode">Image Time:</span> This setting is only applicable, if you add multiple textures to the particle system and "Random Image Choice" is disabled. Enter the time a texture image is shown before the particle switches to the next one, in milliseconds. | * <span class="inlinecode">Image Time:</span> This setting is only applicable, if you add multiple textures to the particle system and "Random Image Choice" is disabled. Enter the time a texture image is shown before the particle switches to the next one, in milliseconds. | ||
* <span class="inlinecode">Blend:</span> Enable this option to change the blend mode of the particles to additive blending (see the effect in the preview images on this page: overlapping red and blue dots result in white). | * <span class="inlinecode">Blend:</span> Enable this option to change the blend mode of the particles to additive blending (see the effect in the preview images on this page: overlapping red and blue dots result in white). | ||
| + | * <span class="inlinecode">Subparticles:</span> If your effect consists of multiple particle systems, you can add the other systems as subparticles to your system. You then have to add only the "master" system to your scene/object instead of having to add multiple objects. | ||
| Line 71: | Line 72: | ||
Each widget contains two red lines (except the one for "Emission Count" which only has one). Grab the nodes to move them. If you set them to different values, particles will receive a random property value from the range in-between, making each particle more or less unique – thus creating a diverse and "chaotic" emitter output. Click on the red line to add a new node. This allows you to turn the line into a curve and let the value change over the duration of one emitter loop. You can delete a node by selecting it and pressing the "Delete" button. Pan the timelines vertically with the right mouse button (if possible). The two input fields below show the horizontal position of the selected node in the timeline (between 0 and 1) and its value. | Each widget contains two red lines (except the one for "Emission Count" which only has one). Grab the nodes to move them. If you set them to different values, particles will receive a random property value from the range in-between, making each particle more or less unique – thus creating a diverse and "chaotic" emitter output. Click on the red line to add a new node. This allows you to turn the line into a curve and let the value change over the duration of one emitter loop. You can delete a node by selecting it and pressing the "Delete" button. Pan the timelines vertically with the right mouse button (if possible). The two input fields below show the horizontal position of the selected node in the timeline (between 0 and 1) and its value. | ||
| − | |||
| − | |||
* <span class="inlinecode">Emission Count:</span> Defines the amount of particles the emitter releases. | * <span class="inlinecode">Emission Count:</span> Defines the amount of particles the emitter releases. | ||
| Line 100: | Line 99: | ||
You can modify the following emission parameters: <span class="inlinecode">Velocity</span>, <span class="inlinecode">Size</span>, <span class="inlinecode">Weight</span>, <span class="inlinecode">Spin</span>, <span class="inlinecode">Angular Velocity</span>, <span class="inlinecode">Motion Randomness</span>, and <span class="inlinecode">Visibility</span>. By default, "Visibility" already has an individual curve added to it to let the particles appear and disappear smoothly. | You can modify the following emission parameters: <span class="inlinecode">Velocity</span>, <span class="inlinecode">Size</span>, <span class="inlinecode">Weight</span>, <span class="inlinecode">Spin</span>, <span class="inlinecode">Angular Velocity</span>, <span class="inlinecode">Motion Randomness</span>, and <span class="inlinecode">Visibility</span>. By default, "Visibility" already has an individual curve added to it to let the particles appear and disappear smoothly. | ||
| − | The last property is <span class="inlinecode">Color</span>. This allows you to add a tint to the particles. The timeline looks a bit different but you can still add new nodes to it and assign an individual color to each of them. The particles will then change their color during their lifetime. Since you define a tint color, adding a white node does not change the original color. Coloring is easiest when working with a white texture. Note that if you | + | The last property is <span class="inlinecode">Color</span>. This allows you to add a tint to the particles. The timeline looks a bit different but you can still add new nodes to it and assign an individual color to each of them. The particles will then change their color during their lifetime. Since you define a tint color, adding a white node does not change the original color. Coloring is easiest when working with a white texture. Note that if you remove all nodes from the color timeline (even the first one which is there by default), your particles will receive random colors or – in case you make use of the "Color" option of the [[#Emitter|custom shaped "Image" emitter]] – they take the color from the emitter image. |
| Line 107: | Line 106: | ||
You can assign a particle system to a scene, a scene object, or an interface button. | You can assign a particle system to a scene, a scene object, or an interface button. | ||
| − | * To add a particle system to a scene open the scene settings (cog icon) and select a <span class="inlinecode">Particle system</span> from the list. The system will be placed on top of all the scene objects and it will be visible infinitely. There is no convenient way to disable it at runtime. Note that the particles will | + | * To add a particle system to a scene open the scene settings (cog icon) and select a <span class="inlinecode">Particle system</span> from the list. The system will be placed on top of all the scene objects and it will be visible infinitely. There is no convenient way to disable it at runtime. Note that the particles will not show up for preview in the scene viewport. |
* If you add a particle system to a scene object, it will be visible only if that object is currently enabled, meaning you can turn it on and off by enabling/disabling the corresponding object through a [[Conditions and Values|condition or value]]. In addition, the particles are displayed on the same layer as the object, so other objects (and characters) can be shown in front of them. Particle systems are added to objects via [[Scenes_and_Objects#Components|components]] and the particles will show up in the viewport, if the second of the two green play buttons above the viewport is enabled. | * If you add a particle system to a scene object, it will be visible only if that object is currently enabled, meaning you can turn it on and off by enabling/disabling the corresponding object through a [[Conditions and Values|condition or value]]. In addition, the particles are displayed on the same layer as the object, so other objects (and characters) can be shown in front of them. Particle systems are added to objects via [[Scenes_and_Objects#Components|components]] and the particles will show up in the viewport, if the second of the two green play buttons above the viewport is enabled. | ||
* Assigning a particle system to an interface button works just like adding it to a scene object. | * Assigning a particle system to an interface button works just like adding it to a scene object. | ||
Latest revision as of 22:53, 11 January 2024
Visionaire Studio features a particle system generator which allows you to simulate animated "fuzzy" and "chaotic" phenomena like rain, smoke, fog, fire etc.
Each particle system consists of an emitter continuously generating and releasing a certain amount of point objects (particles). These particles have a limited lifespan: they are "born" (emitted), they "live", move and may change over time, and they finally "die" (disappear). By assigning images to the particles and adjusting various parameters like number of particles, direction, velocity etc., you are able to create different effects.
Have a look at our Templates page for some working examples.
Set up a particle system
Particle systems are created in the "Particles" section of the editor (snowflake icon in the toolbar). Add a new system by pressing the green [+] icon and name it to your liking.
Viewport
You can preview the currently selected particle system in the viewport on the right (you won't see anything though unless you have added at least one texture/image to the system). Any changes in your particles setup will instantly affect the preview.
- Pan the viewport while holding the middle mouse button; alternatively use the left mouse button while holding "Ctrl" (PC) or "Cmd/⌘" (Apple)
- Zoom in & out of the viewport with the mouse wheel while holding "Ctrl" (PC) or "Cmd/⌘" (Apple), or use the magnifying tools above the viewport
By default, the viewport background is empty, but you can select a scene to show from the list above the viewport. Selecting a scene does not assign the particle system to that scene – it's just for preview purposes. Note that any other particle systems that have already been properly assigned to an object on that scene via components will show up in the preview as well. This is especially helpful if you plan on combining multiple particle systems on the same scene (e. g. rain falling down plus droplets hitting the ground).
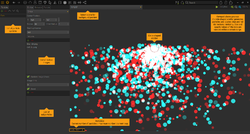
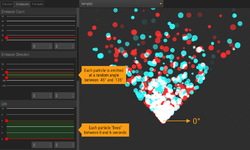
In the bottom left of the viewport you find some statistics displayed: the current number of particles, the maximum number of particles you chose, and the current loop the system is running through (see image).
Emitter
On the "Emitter" tab you define the basic settings of the particle emitter.
First select the shape of the emitter from the list. Its outline – which will not be visible in the game – is displayed in red in the viewport (see image in the previous chapter). In addition to the X and Y coordinates of the Center position of the emitter on the scene, different parameters are available, depending on your selection of shape.
- Point: The particles will originate from a single point.
- Line: The particles will originate from a line. Define the Angle and Length of the line.
- Square: The particles will originate from a square. Define the Radius and optionally the Inner Radius of the square (to create a frame-shaped emitter). The term "radius" means the "width/height" of the square.
- Box: The particles will originate from a rectangle. Define the Width and Height of the rectangular box.
- Circle: The particles will originate from a circle. Define the Radius and optionally the Inner Radius of the circle (to create a ring-shaped emitter).
- Image: Create a custom emitter shape by selecting an appropriate image file. All non-transparent pixels of the image make up the emitter. The image itself will not be visible. If you check the Color option, each particle gets tinted with the color of the point it originates from. This only works though, if you remove any color tint from the timeline in the particle setup (which is added by default), see below.
- Warmup Frames: In most cases you want the particle system to start running in advance, before it becomes visible. In a rainy scene, for example, the rain is supposed to always cover the entire screen and not start to appear from the top each time you enter the scene. That's why you can specify the number of warmup frames (maximum is 360). These frames will not take up extra time – the particle system will fast-forward the warmup frames and start as if the emitter had processed them.
- Textures: By default, particles are empty, invisible objects. If you add a texture image, this image is mapped onto each of the particles, making them become visible. You can add more than one texture to your particle system though. If you do so, the outcome depends on the following two settings.
- Random Image Choice: This setting is only applicable, if you add multiple textures to the particle system. Enable it to map one random texture from your list to each particle. If the option is disabled, the textures are handled as the frames of an animation. Each particle will start showing the first texture, then switch to the second one etc. The duration of the frames is defined in the following option.
- Image Time: This setting is only applicable, if you add multiple textures to the particle system and "Random Image Choice" is disabled. Enter the time a texture image is shown before the particle switches to the next one, in milliseconds.
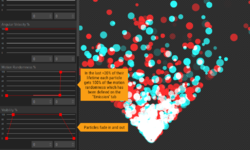
- Blend: Enable this option to change the blend mode of the particles to additive blending (see the effect in the preview images on this page: overlapping red and blue dots result in white).
- Subparticles: If your effect consists of multiple particle systems, you can add the other systems as subparticles to your system. You then have to add only the "master" system to your scene/object instead of having to add multiple objects.
Emission
On the "Emission" tab you control the emission of particles.
General emission settings
- Maximum: Define the maximum number of particles which can be alive at the same time. It depends on other emission settings how many particles are actually alive (the current number is shown in the viewport statistics, first number) and it will usually stay at a certain level. The "Maximum" setting defines the upper limit (second number in the statistics). As long as it is higher than the actual number of particles, it doesn't have any impact. But if you set a value below the actual number of particles, that amount is capped at the maximum and the emitter stops generating new particles until enough particles have "died". You can use this to generate particles batch-wise.
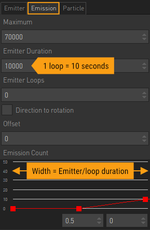
- Emitter Duration: Define the duration of one emitter loop in milliseconds. This setting only effects the emission, if you change at least one of the emission parameters over time. The emission parameters (see below) are set up via timeline input widgets, and the width of these widgets corresponds to the duration of one emitter loop.
Example (see the first example image): "Emitter Duration" is set to 10000 (10 seconds). The "Emission Count" parameter is at 0 until half of the timeline. Then it increases to 10. This is what happens: For the first half of the emitter loop (5 seconds) the emission count is 0, so no particles are emitted. For the next 5 seconds an increasing number of particles is emitted. After that the next loop starts, so there is no emission for 5 seconds again etc. If all the parameters did not change over time (only horizontal red lines in the widgets), you wouldn't notice the loop at all, so "Emitter duration" wouldn't have any visible effect.
- Emitter Loops: Define the number of loops the emitter runs through (see "Emitter duration" for more on loops). Be aware that if the emitter has finished the loops, it does not stop emitting. It will continue with the settings it has at the end of the last loop. It just doesn't start the loop again. Enter a value of 0 to loop infinitely.
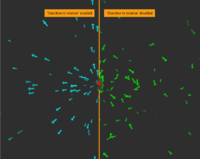
- Direction to rotation: Enable this option to rotate the textures to match the direction of each individual particle. See the second image for an example using a point emitter and an arrow texture image.
- Offset: Only applicable, if "Direction to rotation" is enabled. Adjust the angle of the texture rotation in degrees.
Emission parameters
Each particle is generated with a set of properties which define its behaviour. These emission parameters are set up via timeline input widgets (see image). The width of the widgets corresponds to the duration of one emitter loop. Read the description of "Emitter Duration" and "Emitter Loops" above for more about loops.
Each widget contains two red lines (except the one for "Emission Count" which only has one). Grab the nodes to move them. If you set them to different values, particles will receive a random property value from the range in-between, making each particle more or less unique – thus creating a diverse and "chaotic" emitter output. Click on the red line to add a new node. This allows you to turn the line into a curve and let the value change over the duration of one emitter loop. You can delete a node by selecting it and pressing the "Delete" button. Pan the timelines vertically with the right mouse button (if possible). The two input fields below show the horizontal position of the selected node in the timeline (between 0 and 1) and its value.
- Emission Count: Defines the amount of particles the emitter releases.
- Emission Direction: Defines the direction of emission in degrees (0 is right).
- Life: Defines the lifespan of the particles in seconds.
- Rotation: Defines the rotation angle of the texture image (in degrees). This is a static angle; the particle will not rotate (see "Spin").
- Velocity: Defines the speed at which the particles are emitted.
- Size: Defines the size of the particles.
- Weight: Defines the weight of a particle. The higher the value the more it is influenced by gravity.
- Spin: Defines at what speed a particle (texture) rotates while moving.
- Angular Velocity: Defines how much angular velocity a particle gets on release. At a value of 0 the flight path of the particle is linear. Any other value turns the path into a curve.
- Motion Randomness: Defines how much randomness is added to the movement. The higher the value the more "chaotic" the flight path of the particle gets.
- Visibility: Defines the opacity of the particle.
Particle
The emission parameters (see previous chapter) assign certain individual property values to each particle on creation and by default the particles will keep these values until they die. On the "Particle" tab you can change these start values over the individual lifetime of a particle.
The timeline input widgets basically work as described in the previous chapter. But there are some differences:
- The width of the widgets corresponds to the lifespan of the individual particle (which may be different for each particle).
- There is only one red line per widget.
- All values are percentages which are applied to the initial values the particle received when it was created. That's why the default values of 100% do not change anything at all, meaning the particles keep their initial property values until they die. Likewise, you won't see anything change if you try to modify a parameter which is set to 0 on the "Emission" tab, because 100% of 0 is the same as 50% (or any other percentage) of 0.
You can modify the following emission parameters: Velocity, Size, Weight, Spin, Angular Velocity, Motion Randomness, and Visibility. By default, "Visibility" already has an individual curve added to it to let the particles appear and disappear smoothly.
The last property is Color. This allows you to add a tint to the particles. The timeline looks a bit different but you can still add new nodes to it and assign an individual color to each of them. The particles will then change their color during their lifetime. Since you define a tint color, adding a white node does not change the original color. Coloring is easiest when working with a white texture. Note that if you remove all nodes from the color timeline (even the first one which is there by default), your particles will receive random colors or – in case you make use of the "Color" option of the custom shaped "Image" emitter – they take the color from the emitter image.
Add a particle system to your scene/interface
You can assign a particle system to a scene, a scene object, or an interface button.
- To add a particle system to a scene open the scene settings (cog icon) and select a Particle system from the list. The system will be placed on top of all the scene objects and it will be visible infinitely. There is no convenient way to disable it at runtime. Note that the particles will not show up for preview in the scene viewport.
- If you add a particle system to a scene object, it will be visible only if that object is currently enabled, meaning you can turn it on and off by enabling/disabling the corresponding object through a condition or value. In addition, the particles are displayed on the same layer as the object, so other objects (and characters) can be shown in front of them. Particle systems are added to objects via components and the particles will show up in the viewport, if the second of the two green play buttons above the viewport is enabled.
- Assigning a particle system to an interface button works just like adding it to a scene object.
A word about performance
Be aware that your players might run into performance issues if you overdo particle systems. Something looking good on your development PC doesn't mean it works for everyone out there. While this basically applies for all aspects of your game, particle systems in particular can quickly become computationally intensive. Especially if you add multiple systems to the same scene, slow devices may get into trouble.
The particles are calculated on the CPU and the data is transferred to the GPU every frame. The more particles you have, the more time is needed for that process. So if you can achieve the same effect with less particles (or less particle systems), do so.
If some of your particle effects are just nice-to-have but not essential for the gameplay, you might want to add an option for the player to deactivate them. Just enable/disable the respective objects through a condition.
